Tightening your bike chain. Some love the task, some loath the task — but nevertheless, it’s a task that has to be done, and one that makes all the difference. Regular checking, adjusting, and tightening of the chain is essential for making sure you’re keeping it in tip-top condition, optimising riding performance, increasing its longevity, and ensuring an all-around smooth ride.
How can you tell if your motorcycle chain needs tightening? It’s a question asked more times than you would think! Well, some of the tell-tale signs include:
- A chain that is hanging low
- A tugging feeling
- The chain dislodges itself from the sprockets or snags
- A clanging motion when opening the throttle
It is advised you check your chain tension every 2 or 3 times you refuel, or every 500 miles, (whichever comes first!) Fortunately, tightening your motorcycle chain isn’t a tough job. But you’d be surprised by the number of experienced riders who avoid doing it because they think it is. All it takes is the right tools and equipment and the right steps followed. So, if you need help learning how to tighten your motorcycle chain, check out our quick and easy, step-by-step guide below.
Tightening your motorcycle chain: Equipment checklist
First things first, we want to make sure you’re prepped with all the necessary tools and equipment needed to tighten your motorcycle chain. Before you start, ensure you have the following:
- A torque wrench
- An alignment tool
- A bike stand
- A chain tensioning tool
It’s a good idea to make sure that all your bits and pieces needed for the job are close by and within reachable distance. You’ll also want to carry out this job on a flat service to ensure the adjustments will be accurate, like a garage floor or pavement. You’ll need some clear space around the bike, and for your poor knee’s sake, a nice bit of soft padding.
Step one: Get the bike up
Now you’re all set up, it’s time to get the bike up on the stand. Whilst you can do this on your own, it’s always advisable to get someone to lend a hand if possible. Once you’ve levered the bike up into the right position, you can inspect the motorcycle chain.
Step two: Write down your measurements
Next up, you’ll need to check the chain tension of your motorcycle, as each bike is different. The amount that it needs to be is usually printed on the swing arm above the chain, but if not, you’ll find it in the owner’s manual.
Step three: Check the slack
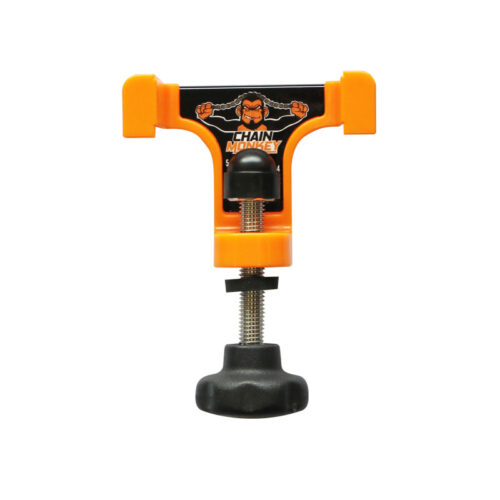
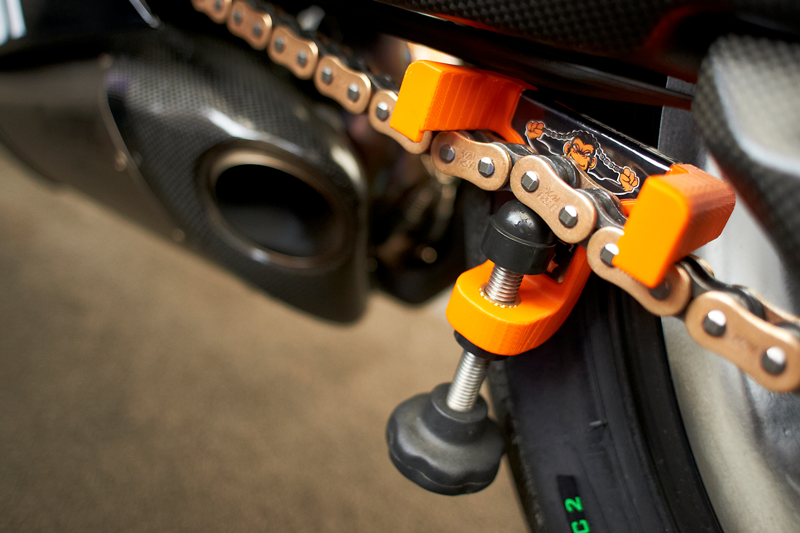
Now you know your motorcycle’s recommended chain slack, you need to inspect your bike to find where it’s currently at. To do this, we recommend using the Chain Monkey Tensioning Tool. Our tool is the first of its kind, designed to simplify the time-consuming task of tensioning a chain. Simply:
- Hook the Chain Monkey onto the chain
- Align the bottom of the domed nut to the required setting line, and adjust the circular stop until it touches the orange base
- Undo the Chain Monkey and hook it onto the chain, then tighten the centre bolt until the circular stop touches the orange base.
- If you are unable to tighten the Chain Monkey to this setting, your chain is too tight, and if there is still slack present, your chain is too loose.
If you’ve not yet invested in the life-changing Chain Monkey tool, then the process will just require a bit more brain power and a tape measure. Find the middle point between the front and rear sprockets. You’ll need to push the chain to its lowest point and then measure the distance between the centre of the chain and the sprocket. Then, find the highest point and measure the distance again. Finding the difference between these two measurements will give you your chain’s tension.
If you’re doing this with your bike on the stand, you’ll need to bear in mind that when elevated, there is no weight on your bike. This means that you’ll need to leave a bit more slack than what is recommended so when your bike is back on the ground with the added weight, it should tighten off.
Step four: Adjust to the right tension
Now it’s time to tighten and adjust your motorcycle chain! If you have Chain Monkey, this process is super simple. All you have to do is set the correct measurements for your motorcycle on the Chain Monkey tool, hook it onto the motorcycle chain and tighten the centre bolt until the circular stop touches the orange base. Then using a spanner, tighten your chain until all the slack is removed, all the while ensuring your wheel is centralised. Remove the Chain Monkey – and that’s it! It’s as easy as that.
For more help with this step, check out our video tutorial below:
Now, if you’re doing this job without the help of a Chain Monkey, it can take much longer and involve a bit more legwork.
- First, use a wrench to loosen the axle nut. Go slowly, ensuring you loosen it enough for it to move freely but don’t remove it completely.
- While each motorcycle differs in terms of mechanisms, your bike will most likely have a bolt that can be turned to adjust the chain slack. Adjust in small increments, making sure to re-measure the slack each time. Repeat this step until the chain is at the correct tension.
- Re-tighten the axle nut to the amount of torque stated in your owner’s manual.
* Additional tip: When turning the adjusters you’ll also be moving the wheel up and down the swingarm. Moving them gradually and equally on each side is essential in keeping everything nice and aligned. If you feel at any point that there could be some misalignment, simple double-check using a tool like the Laser Monkey. The innovative laser alignment tool is designed to ensure the precise and quick setting of the drive wheel on a motorcycle.
Step five: Give your motorcycle a once-over
Once you’ve carried out the above steps, it’s important to double-check everything’s looking good. While your bike is elevated, it’s also a great time to lube the chain if it looks like it needs it.
Why not take advantage of the time it took to set everything up by giving your beloved bike a good maintenance all-rounder? Take good care of your bike, and it’ll take good care of you (we think that’s the saying anyway…). Give the bodywork a good clean using high-quality cleaning gels and waxes, remove the dirt and enhance your braking performance with specialised cleaner,
Whilst your bike is elevated, you can also get a good look at the bike’s undercarriage with little effort to see if there are any other issues that might have gone unnoticed.
There we have it — Tru-Tension’s guide on how to tighten your motorcycle chain. As you can see, it’s a task which really needn’t be a pain and once you give it a go and get your hands dirty, you’ll very quickly realise that it’s pretty straightforward and rewarding!
Looking to make motorcycle maintenance a breeze?
Explore Tru-Tension’s full range of industry-leading motorcycle maintenance products. Formulated specifically for motorcycles, our unique tools and lubricants have transformed the way in which riders and mechanics carry out bike maintenance.